Homemade Chinese Roast Pork Belly – Siu Yuk 燒肉

Home Made Crispy Skin Pork Belly – Siew Yoke

Okay, this isn’t something we eat a lot of at all, but I really wanted to make it, and it’s Roast Pork Belly. I bought my strip of pork belly with bone in and skin on from the Asian grocery market, and we just got a small slab.

Ingredients:
slab of pork belly
1 or 2 cube of fermented bean curd
Chinese Five Spice (五香粉)
White Pepper
Salt
Rice Vinegar (or white vinegar)

The first thing is first, you gotta clean your meat – so rinse the pork belly off well with cold water, and pat it completely dry with paper towels. You do need to make this a few hours ahead, so plan ahead!

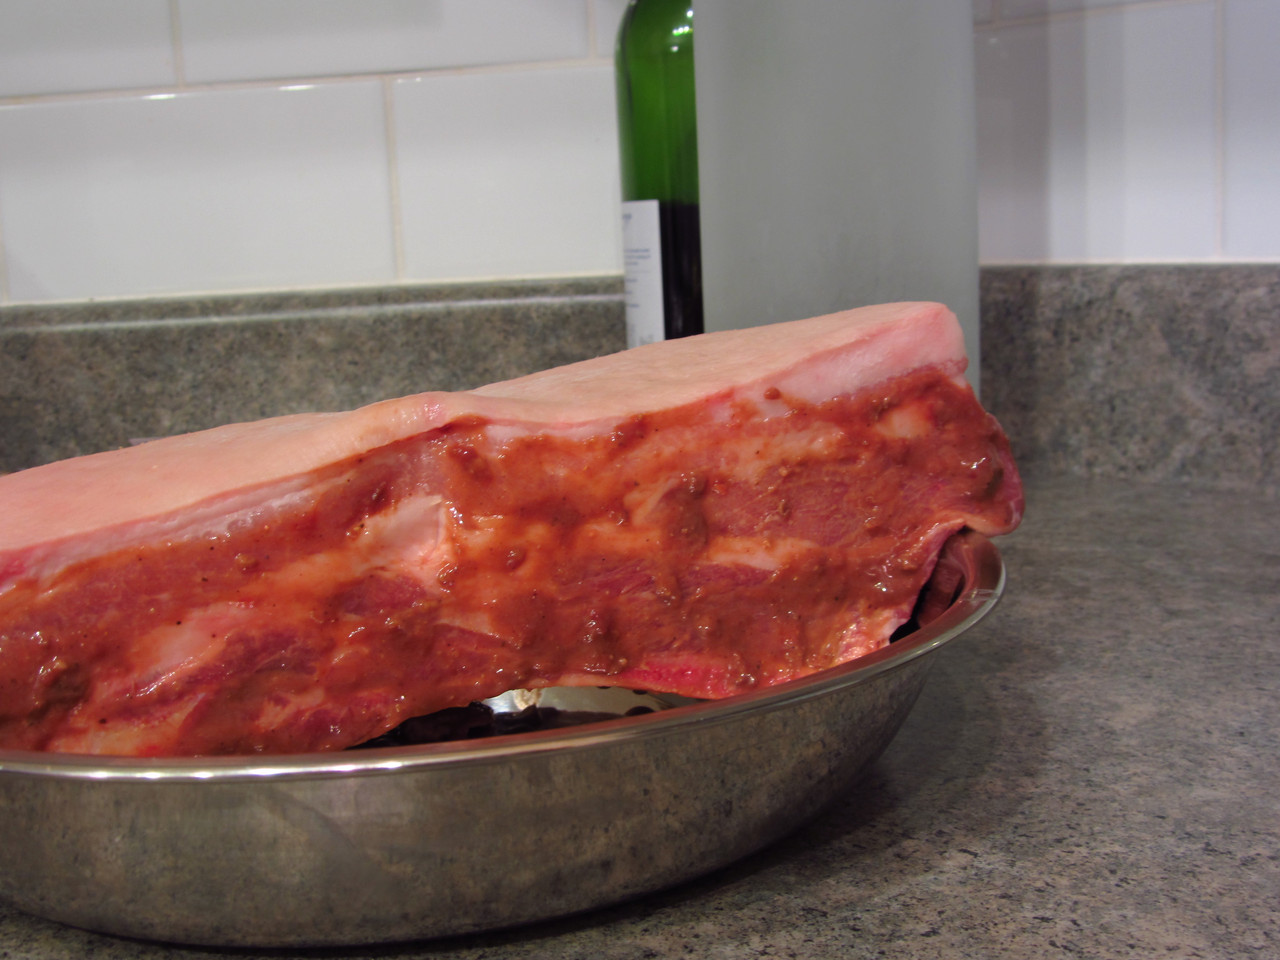
Once the pork is clean, make the marinade for the pork belly by smashing a piece of the fermented bean curd until it’s a paste. Add to the paste the Five Spice, and White Pepper.

Prepare the meat now, by stabbing the skin with your knife – not through the entire skin, but you want lots of punctures on the skin. If you want, cut the actual pork meat so marinade gets through. I didn’t do this as my pork belly has bones.

Then, rub the marinade all over the pork belly EXCEPT the skin. Leave the skin part dry for now with nothing on it. After the marinade is on the pork, rub the salt onto the skin, and do a really good job of it. Try to get it into some puncture holes if you can! Put the entire slab of pork belly onto a wire rack with a line tray underneath and refrigerate for a few hours – or even overnight.

After you’ve marinated for a few hours, take the pork belly out of the fridge while you wait for the oven to preheat. Set the oven to 400F, and then put the pork belly into the oven. Bake for 15-20 minutes and pull it out to brush some rice wine vinegar on the skin. I brush it again after another 20 minutes. Then, continue letting the pork bake until almost thoroughly cooked. To finish the cooking, change the oven setting to broil and give it another 20 minutes for the skin to become fluffy and crunchy.

When the baking has competed, take the pork belly out of the oven and let it rest for 10 a few minutes for the juices to redistribute in the meat, then slice and serve!

Homemade Bor Lor Bao – 菠蘿包

Home Made Chinese Pineapple Bun Recipe

Ingredients (makes 4-6 mini buns):
Dough:
1 1/2 cup flour
1/2 tbsp yeast
1/2 tbsp butter
1/4 cup milk
1 egg beaten
pinch of salt
pinch of sugar
oil

Topping:
2 1/2 tbsp sugar
2 tbsp butter
1 egg yolk
1/4 tsp baking soda
1 tbsp milk
1/2 cup flour
1 tbsp baking powder

First, you make the yeast solution for the yeast to activate by mixing the yeast with a pinch of sugar, 1/2 cup of flour and 1/4 cup warm water

Once the solution has become frothy and has doubled in size, you’re ready to start making the dough. Melt butter, then add milk to the butter.

In a large mixing bowl, combine eggs to the flour and then incorporate the milk mixture and yeast mixture. Knead for a few minutes until a ball of dough forms. You may need to add more water or flour depending on the consistancy.

Once the ball of dough is formed, take another mixing bowl and grease the sides. Put some plastic wrap on the top – or a wet tea towel and wait for 2 hours for the dough to rise. In the mean time, you can make the topping as it needs some time to set in the fridge. To make the topping, cream together the butter and sugar until smooth. Then, add in the egg yolk with milk and mix again. Next comes the flour, baking soda and baking powder. Once this comes in, be sure to mix to combine only. Do not over work this mixture. Form into disks and refrigerate.

After you proof the dough, cut it up into the portion size you’d like your pineapple buns to be. Keep in mind they will rise again, so they’ll be bigger than you make them!

Once you got them portioned out, place the topping and place it on the bun with egg wash. Then, let them rise for a second time. You can score diamond markings on the top of the topping or just leave it – as the diamond texture simulates the look of a pineapple.

When you’re ready, bake in a 375F oven for 10-12 minutes when a toothpick can come out clean – then you’re ready to enjoy!

To get the shiny topping which I didn’t do, you can brush the top with some egg wash (beaten egg with some water mixture).

Homemade Wheat Bread Roll

Home Made Bread Bun

I was on a soup and sandwich for a little while, and all I needed was 2 fresh rolls for lunch! So, I’ve made a little recipe to make either 2 “longer” rolls, or 4 buns.

Ingredients (Serving size 2-4 rolls):
1 package of yeast
1 cup Wheat flour
1/2 cup All Purpose Flour
1/2 cup warm water
1/4 tsp sugar
1/4 tsp salt

First, I activate the yeast by mixing the yeast into the warm water with some sugar. After about 10 minutes, it should become frothy – if it doesn’t, start this step again as the yeast didn’t activate.

I then prepare all the other ingredients for the bread in another large mixing bowl. If you’d like it all white bread, swap it out for whatever flour you would like! Add a pinch of salt into the flour when all the flour is mixed together.

Afterwards, incorporate the yeast mixture into the flour mixture and roll make it into a ball. If it’s too stiff, add some more warm water, and if it’s too sticky, add some more flour (of whichever kind you like). Knead the dough for a few minutes and shape into a ball and let it rise!

Once the dough has doubled in size, proof the dough (deflate the dough) and knead again for a little bit.

Then, form into rolls the shape and approximate serving size you’d like, and leave alone to rise a second time. Once it’s doubled in size again, just pop them into a pre-heated oven at 450F for 20 minutes

I cut a few slits on the top of my rolls before popping them into the oven for decoration. You can choose to do this step or not, or sprinkle poppy seeds, sesame seeds, sunflower seeds or whatever you like!

>

Now, I got my roll to make a delicious sandwich for lunch! Was it worth it? I think so! 🙂 I got some delicious cheese and deli meat to complete this fantastic lunch. Making plain bread opens the doors for many ideas for sandwich making!

Home Made Palmier

I’ve made Palmier‘s twice now from my kitchen, and I had no idea my husband liked this treat until he ordered one at a cafe. To surprise him, I made some at home and he was really happy! It takes no effort at all to make them and no recipe either really!

I use the following ingredients and then just produce them:
Half a sheet of Puff Pastry (thawed)
2 or 3 teaspoons of Granulated Sugar

I then sprinkle some sugar on my work surface, and roll out my puff pastry on top of the sugar – so sugar gets into the the pastry.

Home Made Palmier - Rolling Puff Pastry

When I’ve made it to the dimensions I like, I sprinkle more sugar on top, and I fold in by quarters until they meet in the middle. I then slice them about 1cm thick as my palmiers are smaller than the usual (since I only use half a sheet).

Home Made Palmier - Cutting

I baked them until it’s golden brown on the back, and flip them. It normally takes around 5 to 7 minutes per side in a 400F oven. I let them sit a little bit out of the oven for it to set up and enjoy with tea! 🙂

Palmier

The next time I make this, I think I’m going to make Cinnamon Sugar Palmier as I read about that a few days ago and thought it was an excellent ideal! 🙂